Creating a fairy garden is a fun and imaginative way to transform a small corner of your yard into a magical wonderland. Whether you want a rustic woodland retreat or a glowing nighttime fairy village, these 10 enchanted fairy garden ideas will inspire you to craft your own miniature world.
Each idea includes step-by-step instructions and a visual guide to help you bring your fairy garden to life.
1. Mossy Hideaway
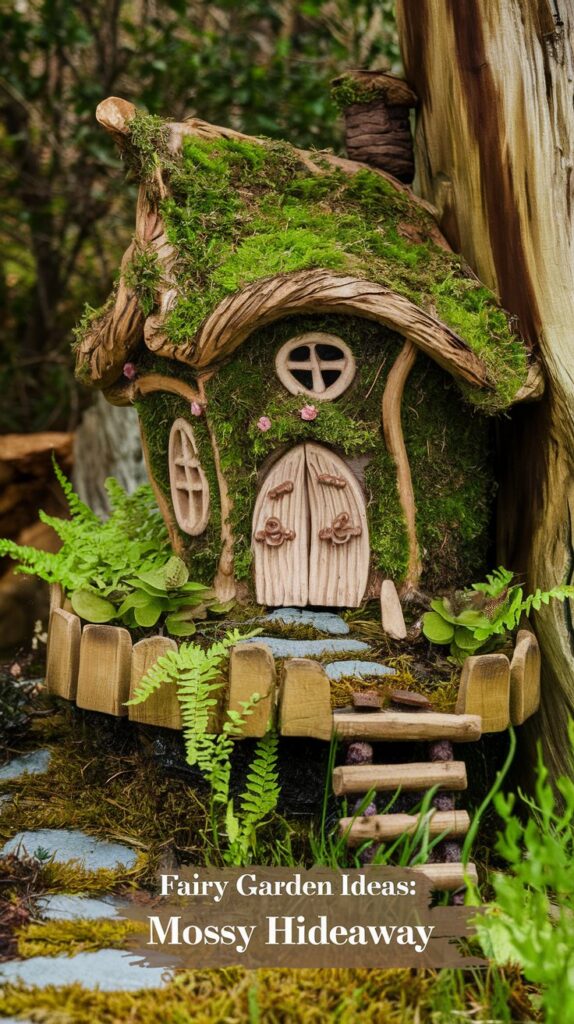
A fairy hideaway covered in lush moss creates a secret retreat where magical creatures can rest undisturbed. With winding stone steps, tiny windows, and cascading ferns, this fairy home looks like it’s been there for centuries.
How to Make a Mossy Hideaway Fairy Garden
A mossy hideaway fairy garden is a cozy, enchanted retreat nestled among lush greenery, creating a secret sanctuary for fairies. Using natural elements like moss, wood, and stone, you can design a whimsical fairy home that looks like it has been there for centuries. Follow this step-by-step guide to build your own magical moss-covered fairy house.
Materials Needed
- A small wooden or resin fairy house
- Fresh or dried moss (sheet moss, cushion moss, or reindeer moss)
- A sturdy base (tree stump, wooden platform, or garden soil)
- Miniature wooden doors and windows (optional if crafting from scratch)
- Small twigs, bark, or pebbles for decoration
- Mini stone pathway materials (tiny pebbles or crushed gravel)
- Fairy figurines, tiny benches, or lanterns for added charm
- A hot glue gun or non-toxic adhesive (for attaching moss and décor)
- A spray bottle for misting moss if using fresh greenery
Step-by-Step Instructions
1. Choose the Location & Base
Decide whether your fairy garden will be placed indoors in a planter or terrarium or outdoors on a tree stump, large rock, or shaded garden bed. A wooded area or a location beneath a tree enhances the hideaway’s natural look.
If using a tree stump or wooden base, ensure it is stable and large enough to hold your fairy house and decorations.
2. Prepare the Fairy House
If using a store-bought fairy house, you can enhance it by gluing moss onto the roof, walls, and around the windows to create a weathered, aged effect.
For a DIY fairy house, use small wooden pieces, twigs, or a hollowed-out log. Cut an entrance and attach a tiny wooden door with a curved top for a cozy aesthetic. Add tiny windows using bark, stone, or miniature frames.
3. Attach Moss & Natural Elements
- Cover the roof and sides of the fairy house with soft moss, securing it with hot glue or garden-safe adhesive.
- Drape moss over the edges of the base to create an overgrown, hidden-away effect.
- Arrange small twigs and bark along the walls for texture.
- Add tiny vines or creeping plants to give the impression of an abandoned, mystical retreat.
4. Create a Miniature Pathway & Entrance
- Use tiny pebbles, crushed stone, or wood slices to form a winding fairy path leading to the door.
- Line the pathway with mushrooms, moss, or miniature flowers for a natural feel.
- Place a tiny wooden ladder or stone steps leading up to the entrance if using an elevated base.
5. Decorate with Fairy Accessories
- Add miniature benches, tiny lanterns, or rustic fairy doors to make it feel lived-in.
- Position small fairy figurines, woodland animals, or gnome statues around the house.
- Hang tiny lanterns or string lights nearby to create a glowing nighttime effect.
Tips & Variations
- For a Woodland Theme: Use only earthy tones, bark, and stone materials for a rustic, hidden hideaway.
- For a Magical Glow: Add tiny LED lights or solar-powered fairy lanterns around the hideaway.
- For an Overgrown Look: Let real moss and creeping ivy grow naturally over time.
Picture This
Imagine a moss-covered cottage nestled among ferns, with tiny mushrooms sprouting nearby. A winding stone staircase leads to a curved wooden door, glowing warmly in the forest shadows.
2. Tree Stump Fairy House
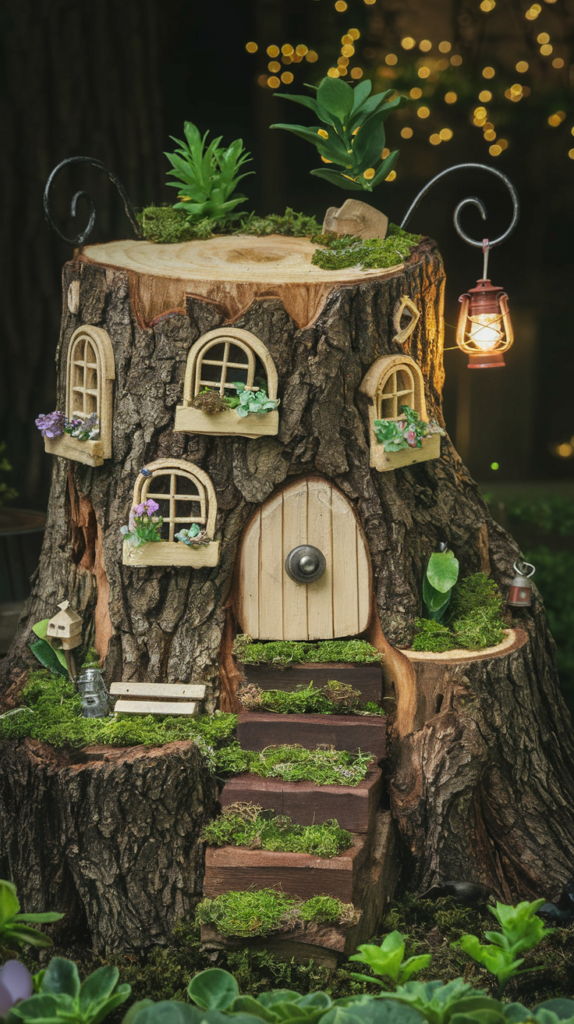
Transform an old tree stump into a whimsical fairy dwelling with charming windows, tiny balconies, and a magical door. This natural fairy home blends seamlessly into the landscape.
How to Make a Tree Stump Fairy House
A tree stump fairy house is a magical way to repurpose an old tree stump into an enchanting fairy dwelling. With the right decorations, this simple garden feature can transform into a whimsical woodland retreat where tiny fairies live among moss, flowers, and tiny wooden doors. Whether in a backyard, park, or potted setup, this project will bring a touch of fantasy to your outdoor space.
Materials Needed
- A sturdy tree stump (or a large wooden planter if no stump is available)
- Miniature wooden doors and windows (store-bought or handmade)
- Moss, vines, or creeping ivy to add a natural, overgrown effect
- Small twigs, bark, or stones for decoration
- Miniature stairs or ladders (crafted from wood, stones, or twigs)
- Tiny fairy figurines, garden benches, or mushroom decorations
- Glue or small nails (if securing windows, doors, or decorations)
- Fairy lights or tiny lanterns to enhance the magical glow
Step-by-Step Instructions
1. Choose the Right Tree Stump
Select a tree stump that is stable and large enough to create a fairy home. If you don’t have a real stump, you can use a large wooden planter or an upturned flower pot to mimic the look.
If outdoors, ensure the stump is free of rot and in a shady area to maintain moisture for moss growth.
2. Add Doors & Windows
Attach a small wooden door to the front of the stump using glue, nails, or screws. You can either buy a pre-made fairy door or craft your own using twigs and bark.
For a more enchanting look, attach miniature windows around the stump. If carving is an option, cut small indentations and insert wooden or glass windows. Otherwise, glue decorative frames directly onto the bark.
3. Decorate with Natural Elements
- Cover the top and sides of the stump with moss, ivy, or small creeping plants for a natural, aged look.
- Add twigs, tiny wooden fences, or flower pots to bring life to the fairy house.
- If available, place a small thatched roof or wooden shingles on top of the stump for a more cottage-like effect.
4. Build a Miniature Staircase & Pathway
- Use flat stones, pebbles, or wooden slices to create a winding pathway leading to the door.
- If the fairy house entrance is higher up, craft a tiny wooden ladder or stone steps leading to the front.
- Surround the path with mini mushrooms, tiny flower pots, or fairy lanterns to enhance the charm.
5. Enhance with Fairy Accessories
- Place small fairy figurines, tiny animals, or a miniature garden bench to create a lived-in feel.
- Add fairy lights or glow-in-the-dark stones to illuminate the house at night.
- Hang tiny lanterns or wind chimes on nearby branches for a whimsical effect.
Tips & Variations
- For a Rustic Woodland Theme: Use only natural elements like bark, stone, and moss.
- For a Magical Glow: Add solar-powered fairy lights or glow-in-the-dark pebbles.
- For a Fairy Village: Create multiple stump fairy houses in different spots for an entire mystical town.
Picture This
Visualize a hollowed-out tree stump with a glowing entrance, tiny steps leading to the doorway, and fairy lights twinkling in the surrounding foliage.
3. Wheelbarrow Whimsy
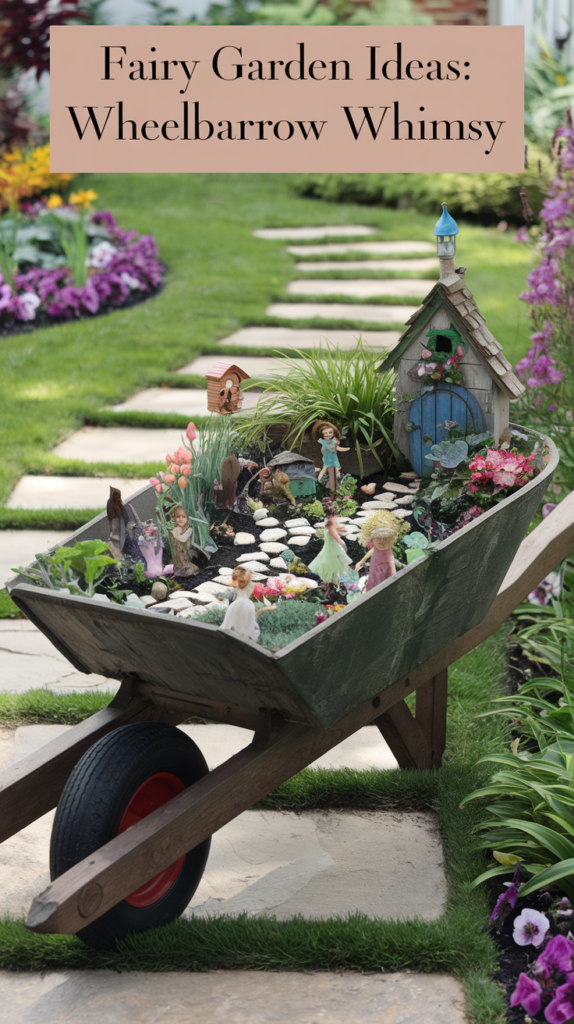
Turn an old wooden wheelbarrow into a magical mobile fairy garden filled with tiny houses, flowers, and mystical creatures. This portable design allows you to move your fairy garden anywhere!
How to Make a Wheelbarrow Fairy Garden
A wheelbarrow fairy garden is a unique and portable way to create an enchanting miniature world filled with fairy houses, vibrant flowers, and magical decorations. By using an old wheelbarrow, you can design a whimsical fairy village that can be moved around your garden or displayed on a patio. Follow this step-by-step guide to craft your own fairy garden in a wheelbarrow.
Materials Needed
- An old or new wheelbarrow (metal or wooden)
- Potting soil or compost
- Small fairy houses (resin, wood, or DIY)
- Miniature plants, succulents, or flowering herbs
- Moss, pebbles, or crushed gravel for pathways
- Tiny fairy figurines, bridges, and decorative mushrooms
- Twigs, bark, or small stones for a natural touch
- Miniature fences or garden accessories (benches, wishing wells, lanterns)
- Small LED fairy lights (optional for nighttime glow)
- Gardening gloves and a trowel for planting
Step-by-Step Instructions
1. Prepare the Wheelbarrow
Choose a sturdy wheelbarrow that is large enough to hold soil, plants, and fairy decorations. If using an old or rusty wheelbarrow, clean it thoroughly and drill a few small drainage holes in the bottom to prevent water buildup.
If you prefer a temporary setup, line the wheelbarrow with landscape fabric or coconut coir to help hold the soil in place.
2. Add Soil & Greenery
Fill the wheelbarrow with a layer of potting soil, leaving enough space to arrange fairy garden elements. Choose small plants such as succulents, creeping thyme, moss, or miniature ferns, which mimic a fairy-sized forest.
Position taller plants toward the back to create depth and smaller plants in the foreground. For a pop of color, add miniature flowering plants like alyssum, pansies, or violas.
3. Arrange the Fairy Houses & Structures
Place the largest fairy house in a focal position, such as near the center or back of the wheelbarrow. Arrange smaller houses, cottages, or DIY mushroom homes around it to create a fairy village feel.
Use small twigs, bark, or decorative stones to enhance the fairy homes, making them blend naturally into the landscape.
4. Create Pathways & Fairy Accessories
- Use pebbles, crushed gravel, or tiny stepping stones to create winding pathways.
- Place miniature fences, wooden bridges, or arched gates to define different sections of the fairy village.
- Add tiny garden benches, a wishing well, or a fairy swing to give the space a lived-in feel.
5. Enhance with Magical Decorations
- Scatter decorative mushrooms, acorns, or tiny toadstools throughout the scene.
- Add small fairy figurines, gnome statues, or tiny animal figurines to bring the village to life.
- Use twigs and moss to create a fairy archway or trellis for an enchanted woodland look.
6. Add Lighting for a Nighttime Glow
For an extra touch of magic, weave tiny LED fairy lights around the edges of the wheelbarrow or place solar-powered lanterns among the plants. Glow-in-the-dark pebbles or tiny fairy lamps can also create an ethereal nighttime ambiance.
Tips & Variations
- For a Vintage Look: Use an antique wooden wheelbarrow for a rustic fairy garden.
- For a Seasonal Theme: Add tiny pumpkins in fall, miniature Christmas trees in winter, or pastel flowers in spring.
- For a Water Feature: Insert a small glass bowl or dish filled with blue stones to resemble a fairy pond.
Picture This: Picture a vibrant, overflowing fairy village inside a rustic wheelbarrow, surrounded by bright blooms and tiny fairy statues, ready to be rolled into the perfect garden spot.
4. Fairy Lantern Garden
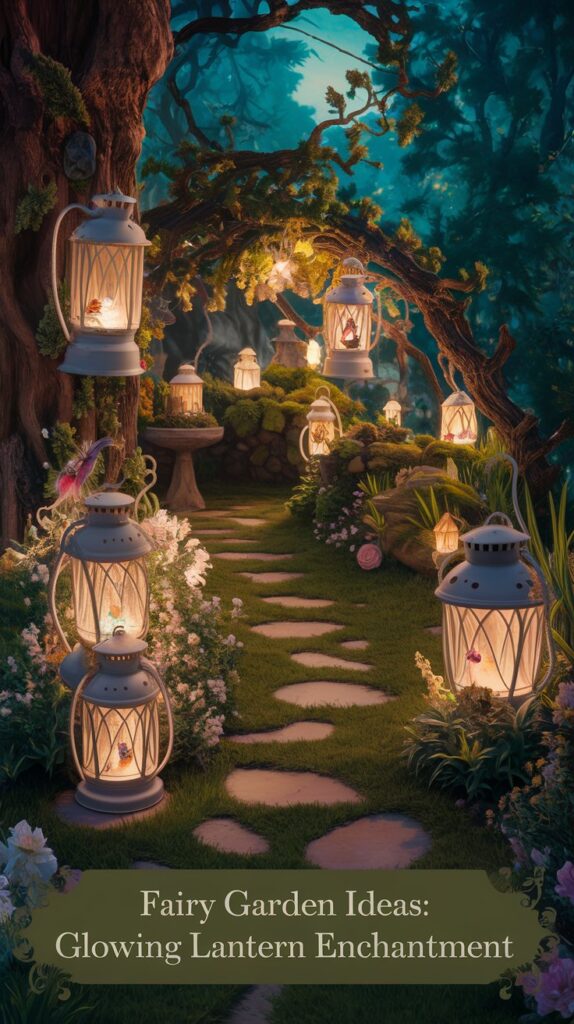
A glowing fairy lantern garden creates a dreamy nighttime display, perfect for illuminating your outdoor space with soft, magical light.
How to Make a Fairy Lantern Garden
A fairy lantern garden is a magical and luminous display that brings a warm glow to your garden at night. By combining delicate fairy homes inside glass lanterns with twinkling lights, moss, and miniature decorations, you can create an enchanting fairy retreat that sparkles under the moonlight. This is a perfect addition to patios, porches, or tree branches, adding a whimsical nighttime ambiance.
Materials Needed
- Glass lanterns or mason jars with lids
- Battery-operated LED fairy lights or small solar lights
- Miniature fairy house, tiny doors, or resin figurines
- Moss, pebbles, or tiny plants
- Twigs, bark, or small decorative mushrooms
- Fine glitter or glow-in-the-dark paint for added magic
- Hot glue gun or double-sided tape for securing decorations
- Small chain or rope (for hanging lanterns, if desired)
Step-by-Step Instructions
1. Choose & Prepare the Lanterns
Select clear glass lanterns, large mason jars, or hanging candle lanterns to serve as the fairy’s home. Make sure they are large enough to accommodate small fairy decorations inside.
If you are placing the lanterns outdoors, choose weather-resistant lanterns with glass panels or acrylic covers.
2. Create the Fairy House Inside the Lantern
- Place a tiny fairy house or a small wooden door against the back wall of the lantern.
- If a fairy house doesn’t fit, create a miniature setup with pebbles, moss, and tiny furniture.
- Secure everything with hot glue or double-sided tape to keep decorations in place.
3. Add Moss, Pebbles & Natural Elements
- Line the bottom of the lantern with soft moss or fine pebbles for a forest-like floor.
- Place tiny mushrooms, twigs, or decorative stones to add natural charm.
- If you want an ethereal glow, sprinkle a small amount of fine glitter or use glow-in-the-dark paint to make elements shimmer at night.
4. Add Lighting for a Magical Glow
- Insert battery-operated LED fairy lights or a solar-powered light inside the lantern.
- Wrap the lights around the fairy house or tuck them under the moss for a soft glow.
- If using glow-in-the-dark stones, place them where they can absorb sunlight during the day.
5. Hang or Display the Lantern Garden
- If you want to hang your lanterns, attach a sturdy chain or rope to the top and secure them on tree branches, garden hooks, or porch ceilings.
- If keeping them on the ground or tabletop, arrange multiple lanterns together to create a glowing fairy village.
Tips & Variations
- For a Rustic Look: Use lanterns with a distressed or antique finish.
- For a Seasonal Theme: Decorate with tiny pumpkins in fall or miniature snowflakes in winter.
- For Extra Magic: Add tiny mirrors or reflective glass pieces to amplify the light inside the lantern.
Picture This: Imagine warm glowing lanterns scattered through your garden, each containing a tiny fairy home, casting shimmering light on the surrounding flowers and greenery.
5. Fairy Door on a Tree
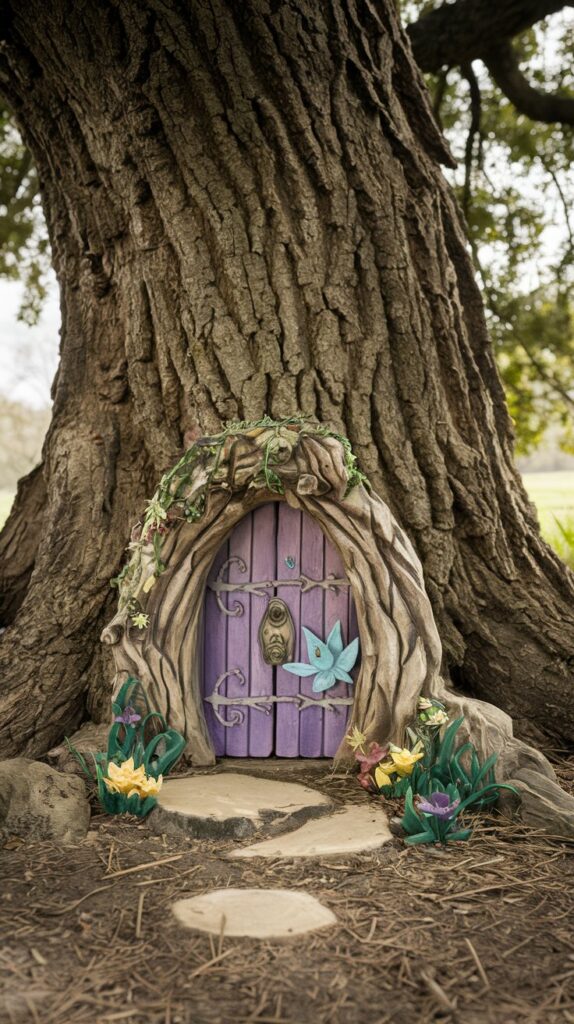
Bring fairy magic to your backyard by attaching a tiny enchanted door to a tree trunk, inviting fairies to step into their woodland realm.
How to Make a Fairy Door on a Tree
A fairy door on a tree is a magical way to create the illusion of a hidden fairy realm in your garden. By attaching a tiny decorative door to a tree trunk and adding enchanting details like stepping stones, lanterns, and moss, you can transform any tree into a portal to a fairy world. This project is simple, creative, and perfect for both kids and adults who love a touch of whimsy in their outdoor spaces.
Materials Needed
- Small wooden or resin fairy door (store-bought or DIY)
- Tiny windows (optional for extra charm)
- Twigs, bark, or small decorative stones for framing
- Moss, vines, or small plants to blend the door into the tree
- Mini stepping stones, pebbles, or a small wooden path
- Mini lanterns, mushrooms, or fairy figurines for decoration
- Hot glue, small nails, or weatherproof adhesive for attaching decorations
- Fairy lights or glow-in-the-dark paint for a nighttime effect
Step-by-Step Instructions
1. Choose the Perfect Tree & Location
Pick a sturdy tree with a smooth, accessible trunk where you can attach the fairy door. The best locations are at the base of the tree, inside a hollow, or between exposed roots to make it look like a natural entrance to a fairy home.
If you want to create a fairy neighborhood, choose multiple trees and add doors at different heights.
2. Attach the Fairy Door & Windows
- Position the fairy door at the base of the tree or within a natural nook.
- Secure the door with weatherproof adhesive, hot glue, or small nails (if attaching to bark).
- If using windows, attach them above the door or on the sides to create the illusion of a tiny fairy house.
3. Add Natural Accents & Landscaping
- Use moss, vines, or creeping ivy to frame the door and blend it into the tree.
- Place tiny twigs, bark, or mini fences around the door to create a more organic look.
- Arrange mini stepping stones or a pebble pathway leading up to the entrance.
4. Decorate with Fairy-Themed Accessories
- Place small mushroom figurines, tiny gnome statues, or a miniature bench beside the door.
- Hang a tiny lantern or string lights to illuminate the entrance at night.
- Use a tiny welcome sign or a nameplate for the fairy home to personalize it.
5. Create a Magical Nighttime Glow
- Paint the edges of the door or the stepping stones with glow-in-the-dark paint for a soft glow at night.
- Add solar-powered fairy lights around the tree trunk for an enchanting evening effect.
- Place a small hidden tea light nearby to enhance the nighttime ambiance.
Tips & Variations
- For a Rustic Look: Use natural materials like twigs, bark, and hand-carved wooden doors.
- For a Seasonal Theme: Add tiny pumpkins for fall, festive garlands for Christmas, or pastel flowers in spring.
- For an Interactive Experience: Create a small “fairy mail” box where kids can leave letters for the fairies.
Picture This: A mystical door peeks out from the roots of an old oak tree, surrounded by soft moss, glowing lanterns, and tiny footprints leading into the forest.
6. Tea Cup Fairy Garden
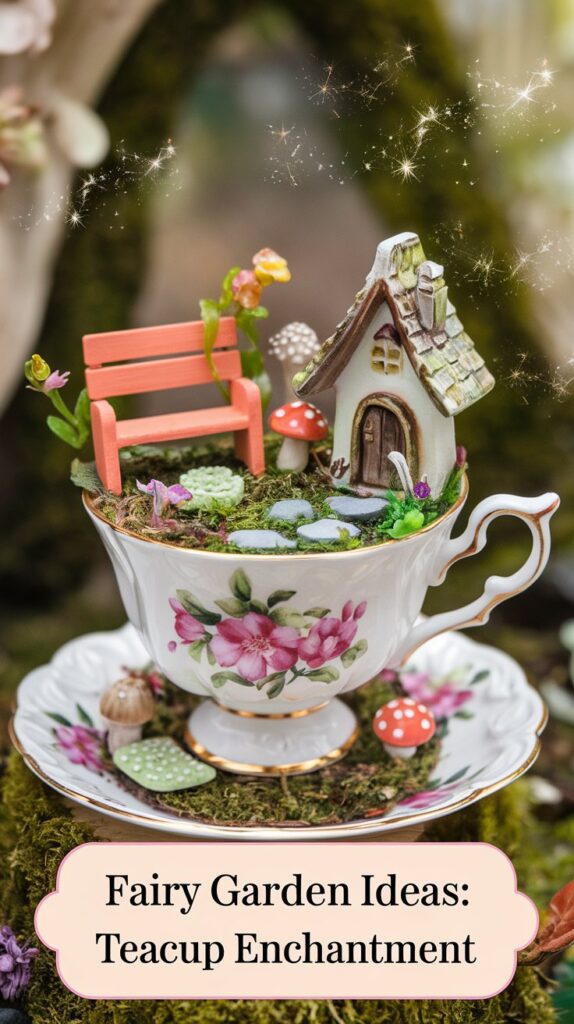
A teacup fairy garden is a delicate and whimsical way to create a tiny world using an old teacup or small planter.
How to Make a Teacup Fairy Garden
Creating a teacup fairy garden is a fun and charming way to bring a touch of enchantment to your space. This miniature fairy hideaway is perfect for tabletops, windowsills, or even as a gift. Here’s a step-by-step guide to making your own fairy garden in a teacup.
Materials Needed:
- A large porcelain teacup and saucer (preferably with floral patterns for a whimsical touch)
- Potting soil or floral foam (to hold the plants in place)
- Moss (real or artificial) for ground cover
- Mini succulents or small plants (such as baby’s tears, ferns, or miniature ivy)
- Pebbles or miniature stepping stones for a pathway
- Tiny wooden bench or fairy figurine
- Small twigs, dried flowers, or decorative mushrooms for added charm
- Miniature fairy house or archway (optional)
- Glue gun (for securing decorative elements)
Step-by-Step Instructions:
- Prepare the Teacup:
- Choose a sturdy, wide teacup that can hold small plants and decorations.
- If planting live greenery, drill a small drainage hole at the bottom (if possible) or add a layer of pebbles before the soil to prevent water buildup.
- If using artificial moss and plants, you can skip the drainage step.
2. Fill the Base:
- If using real plants, add potting soil into the teacup until it reaches just below the rim.
- If using artificial elements, fill the cup with floral foam and cover it with moss for a natural look.
3. Create the Landscape:
- Cover the surface with lush green moss, pressing it gently into the soil or foam.
- Arrange mini succulents or tiny plants to create a fairy-friendly environment.
- Shape a tiny winding path using miniature pebbles or stepping stones.
4. Add Fairy Elements:
- Place a tiny wooden bench under a flower canopy to create a peaceful resting spot for fairies.
- Add a mini fairy house, arched doorway, or twig fence for extra charm.
- Decorate with dried flowers, miniature mushrooms, or tiny garden tools for detail.
5. Enhance with Fairy Magic:
- Sprinkle fine glitter or use small LED fairy lights to give the teacup garden an enchanting glow.
- If desired, position a tiny fairy figurine sitting on the bench or peeking out from behind the plants.
6. Secure & Finalize the Design:
- If necessary, use a glue gun to fix small decorations in place, ensuring they don’t shift over time.
- Give the plants a light misting of water if using live greenery.
- Place the finished teacup fairy garden on its matching saucer for added stability and decoration.
Tips & Variations:
- For Indoor Display: Use artificial succulents and moss to make it maintenance-free.
- For Outdoor Gardens: Choose hardy plants like miniature thyme or dwarf ferns that can survive in small containers.
- Themed Variations: Create seasonal fairy gardens by adding miniature pumpkins for fall or tiny snowflakes for winter.nd fill it with mini succulents or moss.
- Place a tiny fairy house or bridge inside the cup.
- Decorate with mini pebbles, tiny mushrooms, and fairy figurines.
Picture This: A beautiful porcelain teacup holds a lush green fairy hideaway, complete with a tiny wooden bench, a pebble path, and a fairy resting beneath a flower canopy.
How to Make a Magical Mushroom Fairy Village
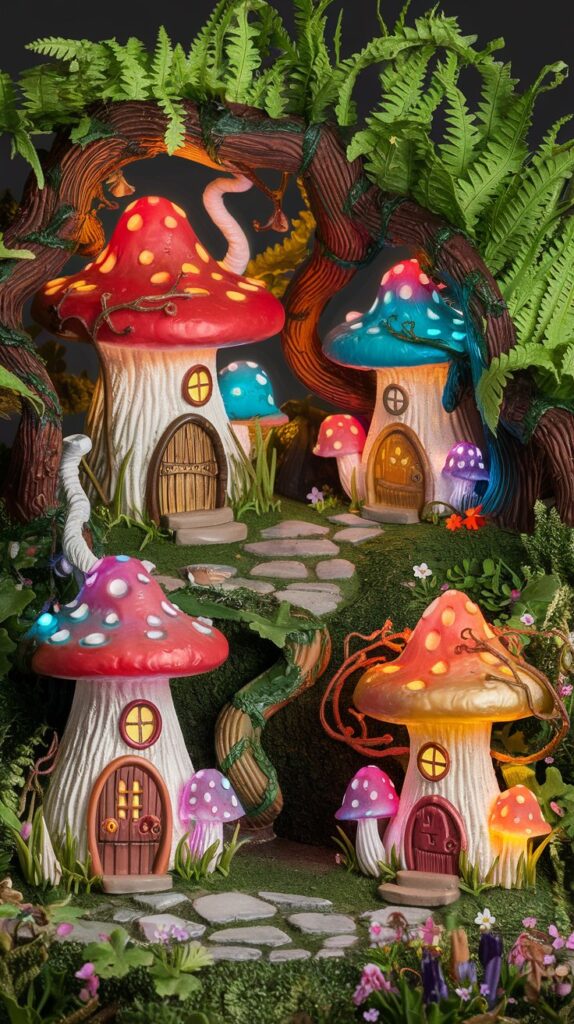
Creating a Magical Mushroom Fairy Village is a fun and whimsical way to bring enchantment to your garden. Whether indoors in a planter or outdoors in a garden bed, this fairy scene will transport you to a mystical land filled with colorful mushroom houses, tiny fairy pathways, and glowing accents. Follow this step-by-step guide to build your own mushroom-themed fairy wonderland.
Materials Needed:
- Miniature mushroom fairy houses (store-bought resin, clay, or DIY)
- A garden bed, planter, or wooden box as the base
- Potting soil and moss (real or artificial)
- Small flowering plants or succulents
- Mini pebbles or sand for pathways
- Tiny fairy figurines or animal statues
- Fairy lights or glow-in-the-dark pebbles (optional)
- Wooden twigs, small bridges, and decorative mushrooms
- Hot glue or garden-safe adhesive (if making DIY elements)
Step-by-Step Instructions
1. Choose the Location & Base
Select a garden bed, planter, or wooden box to house your fairy village. If placing it outdoors, choose a shady spot under a tree or near ferns for a mystical forest look. For indoor fairy gardens, use a large shallow bowl or terrarium for a controlled setting.
2. Build the Mushroom Houses
You can either buy pre-made fairy mushroom houses or make your own:
DIY Mushroom Houses:
- Use small clay pots turned upside down as the mushroom stem.
- Attach a painted bowl, large seashell, or dome-shaped object for the cap.
- Paint in vibrant reds, blues, and yellows, adding white spots or swirls for a classic fairy look.
- Cut a small doorway and window into the clay pot and paint on details.
Pre-Made Options:
- Purchase resin mushroom houses from garden stores or online.
- Customize them by adding moss, tiny doors, or glowing accents for extra charm.
3. Arrange the Fairy Village Layout
Place the largest mushroom house in the center as the focal point. Scatter smaller mushroom homes around it, spacing them apart for a natural village feel. Use tiny bridges, fences, or fairy lanterns to connect the houses.
4. Add Greenery & Landscaping
Cover the base with potting soil and soft moss to create a lush, enchanted forest floor. Plant small ferns, succulents, or flowering plants around the houses to mimic a fairy meadow. Use mini shrubs, twigs, and vines to enhance the woodland atmosphere.
5. Create Pathways & Decorative Elements
Use miniature pebbles, sand, or colored glass to create winding paths leading to each fairy house. Line the paths with tiny mushrooms, toadstools, or fairy figurines for added charm. Place small wooden bridges or stepping stones to connect different parts of the village.
6. Add Fairy Magic & Lighting
For nighttime magic, add fairy string lights around the trees or bushes. Scatter glow-in-the-dark pebbles along pathways for an ethereal glow. Use small solar lanterns or LED mushroom lights for a soft enchanted glow.
Tips & Variations
- Miniature Fairies & Animals – Place tiny fairy figurines, rabbits, or birds for a lively touch.
- Water Features – Add a mini pond using a small glass bowl with blue pebbles.
- Seasonal Themes – Decorate for Halloween with mini pumpkins or for winter with snowy accents.
8. Broken Pot Fairy Garden
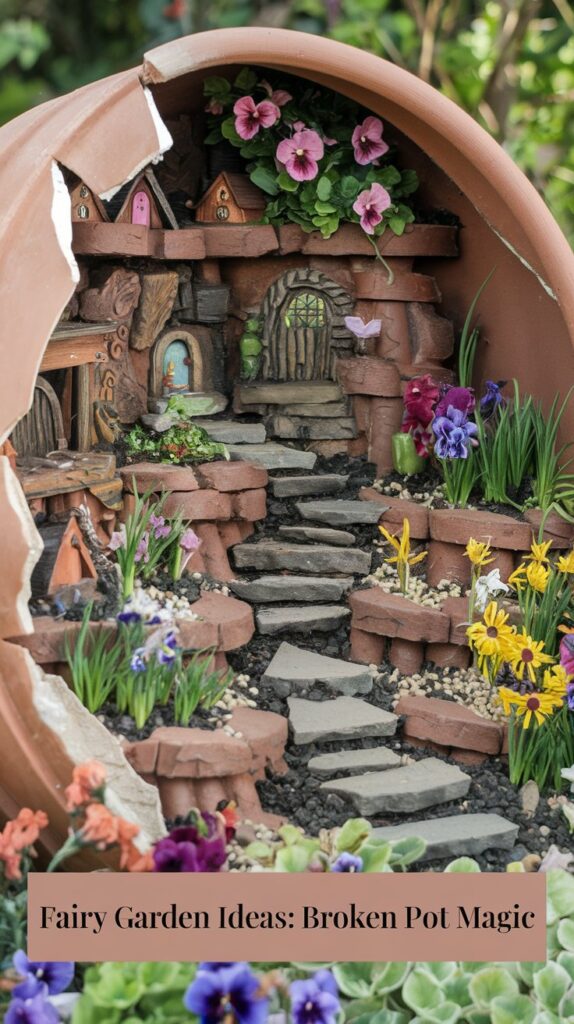
Turn a broken terracotta pot into a tiered fairy garden with cascading steps and greenery.
How to Make a Broken Pot Fairy Garden
A broken pot fairy garden is a creative and eco-friendly way to repurpose damaged terracotta or clay pots into a multi-tiered miniature fairy landscape. This project transforms discarded pottery into an enchanting fairy world, complete with winding stone steps, hidden fairy homes, and delicate flowers growing in the cracks. Follow this step-by-step guide to create your own whimsical fairy retreat.
Materials Needed
- A large broken terracotta pot (or an intact one you can carefully break)
- Potting soil
- Mini succulents, moss, or small flowering plants
- Mini succulents, moss, or small flowering plants
- Miniature fairy houses or small wooden doors
- Twigs or small wooden planks for a staircase
- Fairy figurines, tiny benches, or decorative mushrooms
- Hot glue or garden-safe adhesive (for securing delicate pieces)
- Gloves and safety glasses (if breaking a pot manually)
Step-by-Step Instructions
1. Prepare the Broken Pot
If you already have a cracked or broken clay pot, carefully arrange the large pieces to form a tiered design. If your pot is still intact and you want to break it, wear gloves and safety glasses, then tap it lightly with a hammer or mallet to create large fragments. Ensure the largest piece remains as the base to hold soil and plants.
Arrange the broken sections in a cascading layout, stacking them inside the base to create terraces. Secure any loose edges using garden-safe adhesive to prevent shifting over time.
2. Add Soil & Greenery
Fill the bottom section with potting soil, ensuring there’s enough depth for plant roots. As you stack the broken pieces, add more soil in each tier, stabilizing the structure.
Plant mini succulents, moss, or creeping ivy in the different layers, allowing them to cascade over the edges for a natural look. Use small flowering plants like baby’s tears or alyssum to add pops of color.
3. Build a Miniature Staircase & Pathways
Create a winding stone path using tiny pebbles or crushed gravel leading from the base to the top tier. Arrange flat stones or small wooden planks to form a staircase between levels.
For a rustic look, use twigs glued together to make fairy steps.
4. Decorate with Fairy Elements
Place tiny fairy houses or miniature doors in the crevices to create hidden dwellings. Add fairy figurines, tiny garden benches, and mushroom ornaments to enhance the whimsical feel.
Use mini lanterns or glow-in-the-dark pebbles to create a magical nighttime effect.
5. Final Touches & Care
Lightly mist the plants with water every few days, ensuring they stay hydrated. Occasionally rearrange decorations or replace plants if needed. If placing the fairy garden outdoors, position it in a partially shaded area to prevent plants from drying out.
Tips & Variations
- For a Colorful Look: Paint the broken pot pieces in pastel or vibrant colors before assembling.
- For a Natural Theme: Use only earthy tones, moss, and stone elements for a rustic, woodland fairy village.
- For a Holiday Theme: Add tiny pumpkins in fall or snow-like cotton during winter for a seasonal fairy wonderland.
Picture This: A charming layered garden built from broken pottery, featuring winding stone steps, hidden fairy homes, and delicate flowers blooming in each crevice.
9. Enchanted Fairy Bridge
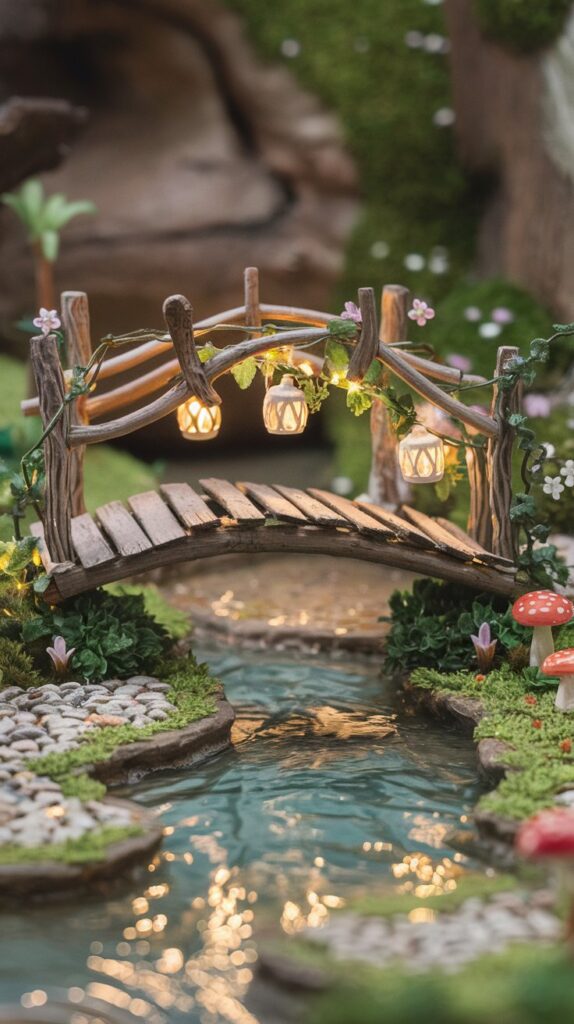
A tiny bridge crossing over a miniature pond or path adds a mystical touch to any fairy garden.
How to Make an Enchanted Fairy Bridge
A tiny fairy bridge adds a magical touch to any fairy garden, creating the illusion of a hidden woodland pathway where fairies and mystical creatures cross a sparkling stream. Whether spanning over a miniature water feature or a dry pebble riverbed, this DIY fairy bridge will become the focal point of your enchanted garden. Follow these steps to create your own whimsical arched bridge.
Materials Needed
- Small twigs, popsicle sticks, or wooden craft sticks
- Hot glue gun or wood glue
- A miniature pond, water feature, or pebble pathway
- Tiny moss or ivy vines for decoration
- Pebbles, small stones, or crushed gravel for pathways
- Mini LED fairy lights or glow-in-the-dark paint for a magical glow
- Scissors and wire cutters (if using twigs)
- Thin floral wire or string (optional for added stability)
Step-by-Step Instructions
1. Choose the Location for Your Fairy Bridge
Decide where your bridge will go. You can place it over:
- A small garden stream or water bowl for a real water effect
- A pebble riverbed or dry creek for a natural forest look
- A mossy pathway leading to a fairy house
Mark the spot where the bridge will sit, ensuring it arches properly over the feature.
2. Build the Bridge Base
If using twigs, select similar-sized pieces and trim them to form a curved arch. If using popsicle sticks, gently bend them over a round surface (like a cup) and let them dry in shape.
Glue several twigs or sticks side by side to form the plank surface of the bridge. Allow the glue to dry completely before moving to the next step.
For added stability, glue thin wire or string underneath to keep the structure firm.
3. Add Handrails & Details
To create railings:
- Use small twigs, toothpicks, or thin wire for handrails.
- Attach tiny vertical sticks along the edges of the bridge to serve as rail posts.
- Wrap tiny ivy vines or moss around the posts for a natural woodland look.
4. Create a Miniature Pathway Leading to the Bridge
Lay small pebbles or crushed gravel on either side of the bridge to create a natural fairy pathway. Line the edges with tiny mushrooms, moss, or flowers for an extra whimsical effect.
5. Enhance with Magical Lighting
For a glowing nighttime effect:
- Wrap mini fairy string lights around the bridge railings.
- Use glow-in-the-dark paint on select stones for a soft, enchanted glow.
- Place tiny LED lanterns or firefly lights along the path leading to the bridge.
Tips & Variations
- Rustic Look: Use only natural twigs and moss for an organic, woodland feel.
- Fairy Tale Theme: Paint the bridge in pastel colors or add tiny floral accents for a dreamy effect.
- Stone Bridge Variation: Use flat stones or polymer clay to craft a tiny fairy stone bridge for a more structured look.
Picture This: A tiny wooden bridge, arched over a babbling stream, lined with glowing fairy lights and lush green moss.
10. Glow-in-the-Dark Fairy Garden
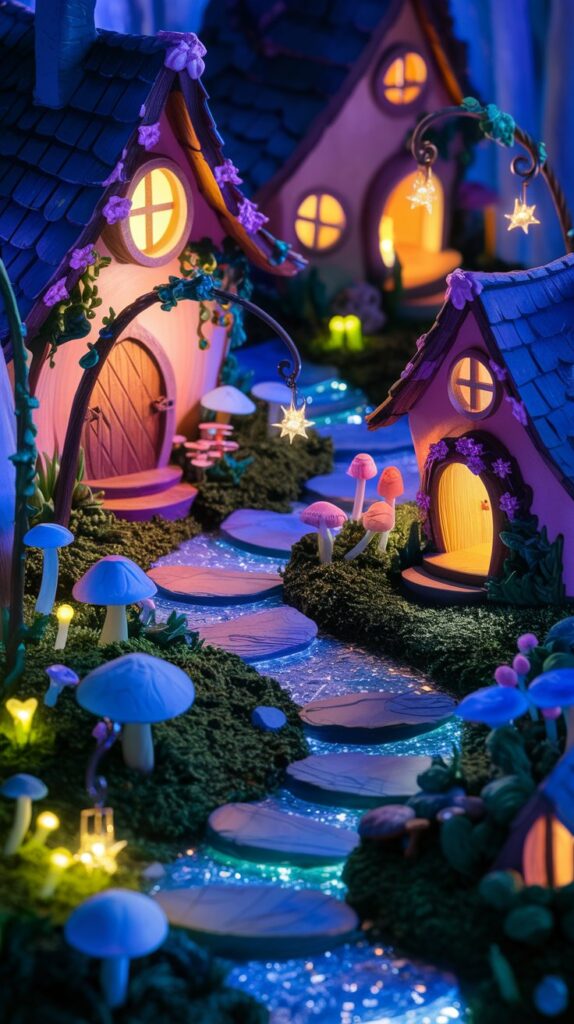
A magical garden that glows at night makes an enchanting addition to any outdoor space.
How to Make a Glow-in-the-Dark Fairy Garden
A glow-in-the-dark fairy garden is a magical way to bring enchantment to your outdoor or indoor space, especially at night. By using luminescent elements, fairy lights, and glowing pathways, you can create a mystical fairy village that comes alive after sunset. Follow this step-by-step guide to craft your own radiant nighttime fairy retreat.
Materials Needed
- Glow-in-the-dark paint or spray (for stones, pathways, and decorations)
- Mini fairy houses with windows (can be ceramic, wood, or resin)
- LED fairy lights or solar-powered mini lanterns
- Small pebbles or crushed glass with a glow effect
- Moss, ferns, or succulents for a lush, natural setting
- Tiny bridges, fences, or figurines (can be hand-painted for glowing effects)
- A shallow planter, wooden box, or garden bed for the setup
- Hot glue gun (for securing decorations)
- Small mirrors or water features to reflect the glow
Step-by-Step Instructions
1. Choose the Location & Base
Decide if you want your glow-in-the-dark fairy garden indoors in a container or outdoors in a garden bed or planter.
For indoor gardens, choose a large bowl, terrarium, or wooden box as your base.
For outdoor gardens, select a shaded garden area or a space under a tree for a more mystical ambiance.
2. Create the Layout & Fairy Houses
Arrange mini fairy houses within your chosen space, ensuring they have tiny glowing windows by painting or adding fairy lights inside.
For a more magical effect, paint the roof edges and door frames with glow-in-the-dark paint. This will create an ethereal glow in the evening.
3. Add Pathways & Glowing Stones
Use glow-in-the-dark pebbles, crushed glass, or painted stepping stones to create a shimmering pathway leading to the fairy houses.
Scatter the glowing stones around plants and edges of the garden to add extra luminescence.
4. Incorporate Fairy Lights & Lanterns
Wrap tiny LED fairy lights around tree branches, small fences, or bridges to illuminate the scene.
If using solar-powered lights, place them in areas where they can absorb sunlight during the day and glow at night.
For extra magic, place mini lanterns or tiny firefly lights near pathways.
5. Enhance with Glow-Effect Decorations
- Use glow-in-the-dark paint on mini mushrooms, fairy doors, and figurines to make them stand out at night.
- Place small reflective mirrors or tiny ponds to enhance the glow effect.
- Add firefly-like glowing orbs using painted marbles or small LED bulbs.
Tips & Variations
- For a Mystical Forest Theme: Use deep blue and green glowing paints to create an enchanted woodland feel.
- For a Whimsical Look: Add pastel-colored glowing mushrooms and flowers for a fairy-tale aesthetic.
- For a Moonlit Effect: Use cool white LED lights or soft yellow lanterns to mimic a dreamy moonlit glow.
Picture This: A mystical fairy village glowing softly under the night sky, with shimmering pathways and houses that radiate fairy magic.
Final Thoughts: Create Your Own Enchanted Fairy World
A fairy garden is more than just a decorative addition to your backyard—it’s a gateway to imagination, wonder, and storytelling. Whether you choose a mossy hideaway, a glowing lantern village, or a whimsical mushroom fairyland, each idea brings a unique charm that transforms ordinary spaces into magical retreats.
From upcycled broken pots to glowing nighttime fairy paths, these enchanting ideas prove that creativity knows no bounds. With a few simple materials, some inspiration, and a touch of fairy magic, you can craft a tiny, mystical world that sparks joy and creativity for years to come.
Now, it’s time to bring your fairy garden dreams to life! Which idea are you most excited to try? Let us know in the comments, and don’t forget to share your fairy garden creations to spread a little enchantment. Happy gardening!